
THIS
OLD HOUSE,
CHARLESTOWN, MA PROJECT
PROBLEMS
AND REPAIR TECHNIQUES
Old
house plaster problems are always unique for each historic building. By
using a few basic tools, having an understanding of the materials involved
and an appreciation of history the solutions easily present themselves.
The
tools you will need are the special reattachment adhesive for stabilizing
the plaster and a patching plaster.
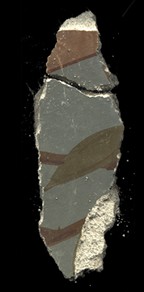
The
plaster materials have been used over thousands of years from Japan to Egypt
to Central America. At the time our Charlestown house was constructed, 1865,
lime and gypsum were used in different ratios to perform different tasks.
The base coat plasters were a mixture of lime, sand, and cattle hair (as a
fibrous binder). These materials were inexpensive and readily available. The
topcoat and the cornice were a mixture of gypsum and lime with no sand or
hair.
Lime plasters have two properties that make them ideal candidates for
repair. Because they crystallize over an extended time frame by the time we
get around to repairing this plaster it’s already had 150+- years to cure.
Lime plasters are young at 100 years. This plaster is flexible (relative to
gypsum) and resistant to water damage. In short, with maintenance, this
material will last forever only getting better with age. Modern gypsum
plasters are stiff, brittle and incompatible with historic plasters and they
won’t stand up to water. Mixing plaster types for patching purposes is not
recommended because they move at different rates, whether from temperature
or vehicular vibrations.
In
the Charlestown project there are three problems going on. There has been a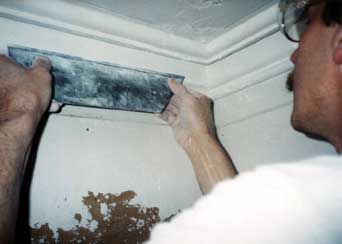 steady increase in the vibration caused by trucks and cars and water appears
to have been cascading through the ceilings. Plus the problem many old house
owners are having to face now, peeling ceiling paint.
steady increase in the vibration caused by trucks and cars and water appears
to have been cascading through the ceilings. Plus the problem many old house
owners are having to face now, peeling ceiling paint.
Evaluating
the plaster stability from both water damage and vibration is a very easy
task to do. It just involves touching the plaster everywhere. Starting at
the cracks working outwards. If the condition is really bad the plaster will
have a great deal of movement, if not, drilling a 3/16" hole through
the plaster to judge the distance between (when the resistance of) the
plaster (to the drill bit stops) and (when) the lath (is hit). This won’t
be such a problem in the dining room but in the living room, being on a main
street, suffers from modern traffic (extensive) vibration. This is visible
in the cracks that radiate from the corners of the ceiling towards the
center medallion. Although the hair in the plaster bridges the cracks and
has kept the plaster from falling, it still needs to reestablish its bond to
the lath. Injecting the plaster re-attachment adhesive under pressure
through the holes drilled for evaluation does this. The plaster is then
clamped temporarily with screws and washers into a "soft" contact
with the lath. These are removed once the adhesive is set. This method
results in a wide area flexible bond being established between the plaster
and the lath which will allow for movement, absorb vibration and retain the
historic plaster. The cracks and injection sites will then be raked out and filled with a mixture of lime and gypsum flush with the
surrounding plaster.
In
the dining room, being farther back from the main street, the plaster
suffered not as much from vibration, as seen in the front room, but from
peeling paint. This situation occurred when two types of incompatible paints
were layered over each other. This is an easily fixed paint problem, not a
plaster problem. The original layer of ceiling paint was calcimine. These
paints are water-soluble and were renewed often, being washed off before the
next layer was applied. Then modern paints were applied over the calcimine
layer. This worked for a while. As each layer was built up the different
types of paint were expanding and contracting at different rates, which
opened up minute cracks. These cracks allowed water vapor the re-hydrate the
calcimine and release its bond to the plaster. The only long-term fix to
this problem is to accelerate the release of the calcimine paint with a wall
paper steamer to strip the paint. This will not harm the lime-based
plasters. After stripping, the plaster is then washed with a sponge mop,
allowed to dry, and painted. The second floor living room appears to be the
only ceiling that doesn’t have this problem on a large scale.
All
the other ceilings in this building suffer from these maladies and will
benefit from this cure.
The
cornice work on this project is mostly sound but has a couple of different
situations to correct. They are; water damage needing complete replacement
and holes from the old steam heating pipes needing to be filled, and some
new lay-out changes which require cornices that exactly match the old. For
these repairs in-kind replacements are order of the day.
The
holes and cracks are raked out and filled using a mixture of lime putty and
gypsum as in general plaster repairs but a high gypsum ratio is used. The
voids are filled and as the plaster starts to set, it’s to cut develop the
profile.
For
complete replacement of cornice lengths the profile must be recovered for a
knife blade to be cut. This knife is applied to wood backing pieces that
allow the knife to be run against wet plaster to creating a length of
cornice the exact duplicate of the original. This is done on a workbench
hence the name "bench run".
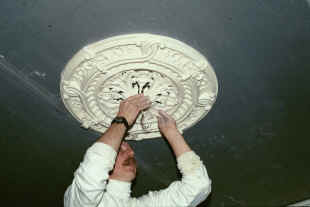
The
medallion care and/or replication is a little more involved. The same
calcimine paint as the flat ceilings have, exists on the medallions. Because
of the pattern of the ornaments getting a paintable surface is more of a
problem. The one medallion pattern in the second floor living room, which
was the original dining room, recognized by the use of food motifs in the
medallion, will be moved to the new dining room. A new medallion, suitably
Second Empire parlor style, will be installed in the new living room.
Because of the peeling paint problem on the original medallion it was
decided to replace it with an exact duplicate. Removing the paint, repairing
the model, making a mould, then re-casting a copy so that it wouldn’t have
the same paint problem. The ornament will be attached much as it had been
done originally, by applying adhesive plaster to the bearing surfaces of the
medallion, then sticking it in place.
This
treatment can also be used to improve the detail lost over the years through
paint build up. On the first floor there are three medallions which suffer
from this loss of detail as well as broken pieces and electrification
damage.
When
electric lights were introduced the floral plaster center canopies were
removed and plain metal canopies accompanying the fixtures were installed.
We will find stylistically appropriate canopies in a rigid casting compound
to mimic these plain metal canopies. The medallions themselves will be
removed, paint stripped, repaired, and modified to accept a modern four-inch
electrical box. Then a mold will be created and an exact duplicate will be
cast. This replacement will be without any of the paint attachment problems,
have original detail without damage, and will accept modern electrical
lighting.
The number one at risk historic material in this country is interior plaster. Historic plasters can be fixed and preserved to be part of a cost effective restoration process. Modern alternatives do not measure up in the long run to maintaining historic plasters. Sadly in the twenty century maintenance has been considered an unfortunate side effect of house custodianship. In this new century people are now reaching back to preserve our collective architectural history